

Science with Sydney
Build an Electromagnet
An electromagnet is a magnet that you can turn on and off. These are different than the magnets that you have stuck to your refrigerator, because those magnets are always “on”. In this project you will be able to make an electromagnet with some simple to find things that you probably have lying around the house (or in the garage). I will walk you through how to build one, show you how I built mine, and tell you a little about how it works. You will need an adult to help you gather the supplies and help you put it all together, so get a parent and let’s get building!
What you will need:
-
Iron metal (a large nail, screw, or iron rod will work)
-
Wire (we had speaker wire that we used, but any wire will work, the smaller in diameter the better)
-
Wire cutter/stripper
-
Electrical tape
-
Batteries (any kind, 9-volt works well, the more volts the stronger the magnet)
-
Switch (if you have one great, if not you can make your own)
Step One:
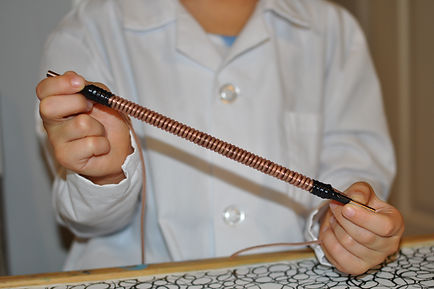
Take your wire and wrap it around your iron core. You will want to wrap the wire neatly and as tight and close together as possible. The more loops around the iron core you have the stronger your magnet will work. This is why you want to have a smaller diameter wire if possible because you can get more turns around your iron core. So take your time, an extra set of hands is helpful for this part. Use the electrical tape to secure the wire when you are done so it doesn’t unwind.

Step Two:
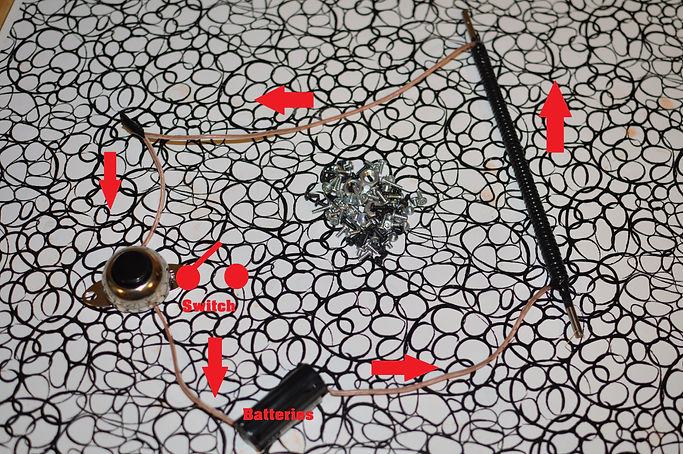
Now we need to connect the batteries and the switch to your wires at either end of the iron rod. This makes a circuit. When the switch is off the circuit is open and the electromagnet is off. When the switch is on the circuit is closed and the electromagnet is on. The switch is important not only so you can turn on and off the electromagnet but also because the batteries will get VERY hot if the circuit is left closed for too long and could explode. So be careful when playing with your electromagnet and give your batteries time to cool down. Follow the diagram below when wiring your circuit.
Watch Sydney:
Sydney will show you how she built her electromagnet.
How it Works
Now that you have made a totally awesome electromagnet, let’s learn a little more about how it works.
First, why did we use an iron core? Why not some other kind of metal like nickel or copper? When making a magnet you want to choose a metal that is ferromagnetic. Ferromagnetic metals are metals like iron or steel that are highly permeable. By permeable we mean they are more susceptible to accepting a magnetic charge. This metal rod in the center of the electromagnet is called a solenoid.
As I mentioned earlier when telling you how to build your magnet, I said it is important to wrap your wire neatly and tight. This is because the strength of an electromagnet is directly correlated to the amount of turns the wire has around the solenoid. In other words, the more times the wire goes around the solenoid the stronger the magnet will be.
Making the electromagnet was relatively simple, so how does it come to life when you run electricity through the wires? When you run electricity through the wires it actually rearranges the atoms in the solenoid (albeit temporarily). The atoms in the solenoid are usually going in all different, random directions. This results in no magnetism. But when you introduce electricity it will actually rearrange these molecules to face in the same direction (making the magnet), and when the electricity is cut off they go back to their random arrangement (and the magnet turns off).